My journey toward a peaceful, organized family, home and life!

Monday, October 31, 2011

Paper Clutter: "Action" Station

I've been diligently working on my paper clutter since starting my online course via Simplify 101.

I'll show the "before" pictures after the "after" pictures simply because the top picture shows up on my "Popular Posts" sidebar gadget.

My "action" station, where I process incoming paper, is pictured below. I keep it at my computer desk in the master bedroom since this is where we pay our online bills and print off all manner of papers! I'm still searching my house for an "Inbox" to keep by our main floor phone for incoming/unprocessed papers.


This "action station" is a desktop/upright file box that took me a bit of time to find (I had to go to an actual office supply store rather than just Walmart). I got the idea from The Nest Effect here and A Bowl Full of Lemons here.

I picked up these hanging files at a local thrift store for a steal of a deal! I don't even mind the gray! Since they didn't come with any plastic tabs, I used some sticker ones that I picked up at a scrapbooking store ages ago and couldn't bring myself to part with when I last purged!

The categories are:
  • Incoming Mail
  • Outgoing Mail
  • To Do
  • To Pay
  • To File (subdivided by folders: Reference, Archive, Recipes, Receipts)
  • Coupons
  • a file for each family member
  • To Dispose Of (subdivided by folders: To Recycle, To Shred)

Incoming Mail

Somewhat self-explanatory... I put any incoming paper that I'm not organizing immediately in here.

Outgoing Mail

Again, somewhat self-explanatory... My outgoing mail usually has something to do attached to it (missing address, special postage) and can include non-urgent items being sent back to school with a child.

To Do

Completely self-explanatory. Something that can't be done RIGHT AWAY, goes here. I try to remember to check it on a regular basis to get those things done!

To Pay

Completely self-explanatory. The majority of my bills arrive electronically but there are the odd ones that are still mailed. I mark the due date on our calendar and put the bill in this file temporarily.

To File

Reference: Items that need to be filed in our Reference Binder, also known as a Command Central or Family Management Binder (more on that in an upcoming post).

Archive: Items that need to be filed long-term in our filing cabinet (more on that in an upcoming post).

Recipes: Recipes that I print off that need to be filed away in my Recipe Binder.

Receipts: I've never really kept track of receipts before but this is a temporary holding place for receipts that I may need for returns. Any tax receipts or those that are attached to a warranty or major purchase, will be filed in my filing cabinet.

Coupons

I don't pay particular attention to coupons (something I plan to change... it's on my To Do list!) but the ones that I see fit to print off, get the expiry date noted on my calendar and are filed here until ready to use.

Family Member Files

Any papers that aren't (ultimately) my responsibility or that need a temporary holding place are filed by family member name.

To Dispose Of

To Recycle: Since our recycling bins are downstairs in the pantry, anything that I don't want to throw in the trash (or shred) goes in here. I take care of it if it piles up a bit.

To Shred: I had actually been contemplating the purchase of a paper shredder for some time. It would always get shuffled to the back burner. After it was highly recommended that everyone should have one, I passed by one on sale at Walmart. In the cart it went! It has all sorts of safety features that a mother of young children likes to see. I store any items that will need to be shredded in this folder and my elder daughter loves to help me shred!

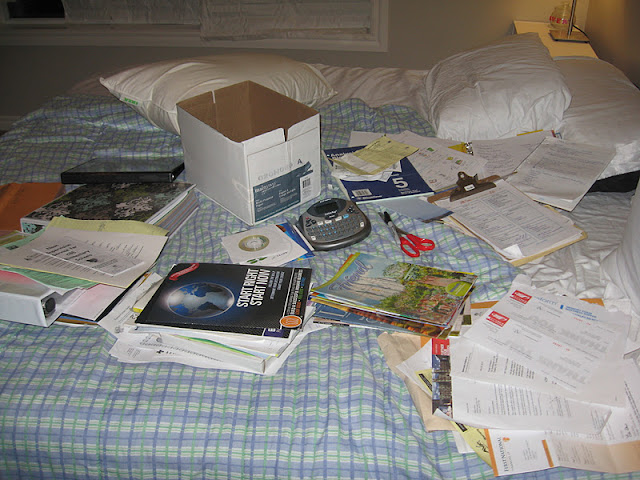
Here is a glimpse of the mountain of sorting I had to do... That giant box in the center is the collection of paper piles in my house! (There's even more, of course, hiding in drawers and boxes elsewhere.)


Here is the completed sorting:


My reference binder and filing cabinet organization are coming up!

I'm linking this at:
Sunday, October 30, 2011

First Menu Plan!

I put together my first menu plan last evening... I decided on mostly slow cooker meals as I will be working during the supper hours...

Monday (Halloween!) - grocery shopping (and supper?) @ Costco
Tuesday - Texas Chili (uses beef bits rather than lean ground beef)
Wednesday - Slow Cooker Lasagne
Thursday -Mini Gyro Meatloaves
Friday - Sloppy Joes
Saturday - Better-than-Ever Enchiladas
Sunday - Slow Cooker Cilantro Lime Chicken

I know there's a lot of beef in here but I'll get better with time!  ;)

I've linked this up at (click image to go to the specific post):

The Organised Housewife

Tuesday, October 18, 2011

Under the Bathroom Sink

This was my very, very first organizing project on this stint of mine... Under the bathroom sink.

I do not have a before picture but imagine, if you will, female bathroom paraphernalia from the past 15 years...

Yowch!

It was in boxes that had been moved around the bathroom and finally ended up in the closet. It was in plastic bags thrown on top of each other in the cupboard by a fed-up husband who had been trying to work on the plumbing.

It was a nightmare.

I found a 3-drawer bin at Walmart for $13 and knew that this was the perfect jumping off point for this project.

I went to work.

I purged mercilessly (did I really need that cologne from an old boyfriend?? really?? I mean, I've been married for 10 years!) and came up with this:


It is, quite obviously, still not perfect, but it is a dramatic improvement. In order to finish this project, I need to organize my counter and drawers which I haven't been able to do yet due to a 2-year-old with sneaky little fingers.

I am lucky to have vessels rather than sinks in my bathroom which allows much more clearance.

The tiny drawers in the top left bin house all my hair necessities... I should probably label it but I know exactly what's in each drawer: bobby pins/metal clips, hair elastics, claw clips, other barrettes, etc.

The blue bin on the bottom left houses my bigger hair clips as well as "feminine necessities." So accessible! I store bulk items in behind. Under the plastic lid is all my earrings and necklaces. I have barely any jewellery due to little ones breaking my meager supply. Eventually, I'd like to create this for my earrings:


and have something like this for my necklaces:


The big drawers hold all my facial, makeup and hair product stores, as well as such things as chapstick, deodorant and other body products.

Organizing solutions are always evolving as we do so I will probably put this up at least once more in the future... Vastly improved, of course!

I'm linking this to A Bowl Full of Lemons 21 Days to Getting Organized Challenge (click on the image for link).

Monday, October 17, 2011

Junk Drawer

I haven't been slacking!

I have several projects partway completed. In order to finish them, I need to start and complete other projects!  ;)

I purchased some inexpensive organizing bins for a specific drawer today and then ended up using them in my junk drawer because they fit so perfectly and SOMETHING had to be done about the drawer.

This drawer is still not being utilized EFFICIENTLY but at least it's organized!

Here is the "before" that I barely remembered to take:


And here is my "after":


I'll have to get some more of those bins for my original intention...

I'm linking this up to A Bowl Full of Lemons 21 Days to Getting Organized Challenge (click on image for link).

Tuesday, October 11, 2011

Recipe Binder

This is one of the first projects I started during this organization kick. I finished it in pretty good time but then I wanted to add some pretty paper to the front/spine. I have TONS of patterned paper but I just couldn't seem to coordinate bringing the binder to my craft room.

Finally done! Well, I may eventually add a label (printed or stamped) but for now, I just like looking at the pattern.


 As you can see, it is quite a large binder. It has to be with all the dividers I have inside!


Each of the dividers has pockets! These were a fabulous find at the dollar store!

 Within my Menu Planning section, I have subcategories...
 At the beginning of every section (ie. Desserts, Entrees), I have a free printable from I Heart Organizing. I will use this to track "Tried and True" recipes from other sources (ie. cookbooks, my other recipe compilations).

My categories are vast!
  • Menu Planning
  • Breakfast - Pancakes
  • Breakfast - Waffles (I need to divide out the pumpkin recipes in both of these breakfast categories!)
  • Breakfast - Other
  • Breads/Muffins
  • Appies/Dips
  • Soups
  • Salads
  • Sides
  • Entrees - Pasta (I plan on subdividing this by meat)
  • Entrees - Beef
  • Entrees - Chicken
  • Entrees - Pork
  • Entrees - Vegetarian
  • Entrees - Other (for things like sausage or tuna... I don't care for any other type of seafood)
  • Desserts - Cakes
  • Desserts - Cookies
  • Desserts - Other (I need to divide out the pumpkin recipes in Desserts as well... love me some pumpkin!)
  • Beverages
  • Cooking Tips
I will probably further subdivide my poultry into chicken and turkey and all my entrees will have a slow cooker section. I like being able to find what I want, when I want it!!

Here's a quick video I did just because I'm a nerd like that!!


I've linked this up to A Bowl Full of Lemons here and to Delightful Order here.

{Edited to add:} I was featured!

Monday, October 10, 2011

Kiddy Plastic Drawer

I'd have to speculate that most people with small children have a drawer like this:


Ugh. The kiddy plastic drawer.

Doesn't matter how many times I organize it, it NEVER stays organized. It is, after all, one of the few chores that little ones can safely participate in (unloading plastic ware from the dishwasher).

And then I saw this...


Hooray!!! The solution!!


My bins aren't quite as deep as DaNita's but they seem to be working alright... And they fit so perfectly!  *sigh*

We'll see how this survives my kiddies over the next week! I can always get deeper bins, if necessary!

I linked this at A Bowl Full of Lemons here.

Sunday, October 9, 2011

Night Stand

Most of the beautifully-decorated nightstands that I see are very simple. They have a light and a small vase or picture frame.

I love the effect but I am definitely not a decorator.

I need a large clock (since I'm blind as a bat) and the phone is housed next to my side of the bed. And, unfortunately, my nightstand is always cluttered with books and magazines as I do all my reading in bed.

I always try to have one book on the go (aside from scriptures) which can be from my own library or the public library. I can't just tuck public library books away or it will probably be forgotten and incur a late fine. I don't collect a lot of magazines but the monthly one(s) that I do receive, need to be where I can see them so that I remember to read them.

I haven't been able to find a magazine rack solution yet (hopefully soon!) but I came across a pot-lid/kitchen organizer at the dollar store. The metal partitions were straight up and down so I just bent them at an angle to accommodate books/magazines in a more intuitive way.


This take up slightly more room than a stack but looks much better to me... Everything can be easily visualized and accessed!

I linked this at A Bowl Full of Lemons here.

Thursday, October 6, 2011

Desk Drawer

Our desk drawers are catch-alls for desk paraphernalia, aka junk drawers.

I turned my deepest desk drawer into wonderfully organized desk storage! It's a small project but it makes me happy and gets me that much closer to organizational bliss.

I forgot a before pic (again!) but here is all the junk that was piling up in the drawer:


I have an idea as to where I will be putting this, but for now, it is stacked on top of our computer hutch.

I'm still happier.

Here is the drawer now:


 Page protectors, address labels, printer paper and photo paper (2 sizes). It all fits perfectly!


Who knows, I may decide sometime in the future that this space is better used in some other way, but for now, those items have a home!

Wednesday, October 5, 2011

New Dishes and a Cupboard Reorg

I've been a busy, busy, busy bee! Hooray!

And a little bit naughty.

I bought new dishes.

The old ones were driving me nuts!

They were heavy, dark, bulky and square-ish which made it very difficult to fit the bowls in the dishwasher.

Etc.

But the new ones were only $20 a box at Costco...

Surely I will be forgiven!!

Being new at documenting organization projects, I didn't take a before picture.  :(  I really didn't think that my changes would make a very big difference in appearance, but they did!!

Here is what my "new" cupboard looks like:


Those who have seen the old cupboard will surely agree that the dishes were a superb investment.

;)

I think I'll move that top shelf down a bit. Will make those fabulous blown glass dessert cups more accessible. If I had an extra shelf, I'd add it to the top, but I don't...  :(  Looks kind of bare up there! Perhaps I can find one of those wire shelves that rests on the shelf below it...

I put the bottle of kid vitamins in with the dishes so that we will remember to disburse them! A fabulous tip I found on the web somewhere.

One project that I think I would eventually like to do is to put decorative paper behind the shelves (a project that I saw here and here)... Would def add interest and class!!

Tuesday, October 4, 2011

Weekly Menu Planner

Jen just shared some awesome reader kitchen ideas!

One of the photos was a DIY menu planner. Seeing it reminded me that I had not only made my weekly menu planner, I actually use it! At least, sometimes I use it...


My pantry is one of the things on my Organizing To Do List, but it's not too bad.  ;)


Okay, so my complete ignorance of "handy" terminology is going to embarrass me here...

This menu planner is made from a board of some sort that I covered with chalkboard paint. The second coat was applied about half an hour later. Once completely dry, I applied the precut vinyl words with transfer tape. (You could use a personal electronic cutting device, such as a Cricut or Silhouette, to make these but I didn't.) I rubbed the entire board with chalk (it was so sad to  cover that perfect blackness!) and then wiped it off with a paper towel (chalkbrush would be ideal, but I don't have one).

That's it! Ready to go!

I definitely can't take credit for this idea since I made it at a church function!  ;)

Now if only I would consistently plan my menus

I linked this to the link party at A Bowl Full of Lemons One Project at a Time here.

Monday, October 3, 2011

Not Another Blog!

Over the course of the last three years, I've created at least 7 blogs for myself, one or two for others and contribute(d) to several more. A few of these have fallen by the wayside and yet I decided it was time to create yet another blog.

This {IRL} blog is to document my journey through creating a more organized family, home and life. All of the above are currently in a state of chaotic day-to-day survival and I mean to change that!

If you are looking to do the same for yourself, I recommend the following:
  1. Education!
    • Follow some organizing blogs. This is what got me interested in getting organized in the first place! Ones that I particularly enjoy are:
    • Identify areas you'd like to organize. Pretty much everything for me! Each room in my house needs attention, not to mention my paper clutter! I'm going to establish a cleaning regimen and I want to work menu planning into my routine, thus organizing my time/grocery trips and taking the stress out of every day/evening!
    • Get some free downloads. Some that I enjoy can be found on:
    • Since magazines cost money and add clutter, I prefer to use Pinterest, Google/Google Images and Etsy to find pictures of organizing ideas/solutions. I also evaluate organizing printables to help me come up with a solution for myself. My spreadsheets will definitely not be as attractive as what is out there but should work for me! (I still ended up buying this and this.)
    • There are so many books out there! I haven't had time or the inclination (beyond putting this book on hold at the library) to read up on this. Instead, I signed up for a couple of online courses at Simplify 101! (So excited to have found this place!) Organizing 101 and Organize Your Paper Clutter lessons have constituted my very informative reading. (I do not recommend taking more than one course at a time!)
  2. Action!
    • Evaluate where you are and where you'd like to be. I envision order and peace; a place for everything and everything (sometimes) in its place! (This IS real life after all!)
    • Don't scare yourself off with the time factor. Aby suggests starting with only 15 minutes each day to declutter. Things will start changing! Things will start getting easier! (That, in my mind, is a sign that it's time to find your next area of attack!)
    • It's okay if you fall off the wagon! Just be sure to get right back up! That's how habits are formed... Doggone persistence. Or necessity (like breathing). Or both!
    • If you are a perfectionist (thank goodness that I am not hardly am!), you will need to tell yourself that it doesn't all have to be perfect NOW... or even ever! Take a relaxed, but determined, approach.
My tendency is to jump in to new projects with both feet but I can be easily discouraged/deflated. I want to keep my motivation (and action) high! My hope is that this blog will help to keep me accountable. I will be able to see the progress that I am making in my life, even if it seems to be taking FOR-EVER!